Optical character recognition
Introduction
Optical character recognition is the electronic conversion of images of typed, handwritten, or printed text into machine-encoded text, such as from a scanned document or a photo of a document.
In this tutorial, we are going to build an OCR engine that can locate each word separately from message screenshots. It’s a common scenario where we want to extract text information from images. For example, we can use this OCR engine to extract text in characters from a screenshot of a message and then use Forte to build words based on the extracted characters to search for the message in a database. The user can apply similar ideas to achieve word separation in OCR to a book or a receipt.
We first need to read an image containing text from the data source and then process it to obtain the text. Therefore, we need a reader and a processor in the pipeline. Plus, we also expect that for each character, we can locate a bounding box in the original image. Therefore, we use the ontology forte.data.ontology.top.Link that links forte.data.ontology.top.Annotation and forte.data.ontology.top.Box.
Pipeline Components for OCR
OCR Reader
A reader reads the image from an URL and loads it into ImagePayload in the DataPack.
[10]:
from forte.data.base_reader import PackReader
from ft.onto.base_ontology import ImagePayload
from PIL import Image
import requests
from forte.data.data_pack import DataPack
from typing import Iterator, Any

class OcrReader(PackReader):
    r"""
    :class:`OcrReader` is designed to read an image for an OCR task.
    """
    def _collect(self, image_path) -> Iterator[Any]:  # type: ignore
        r"""
        Should be called with param `image_path` which is the path
        of the image file.

        Args:
            image_path: Image path.

        Returns: Iterator over paths to Image files
        """
        return image_path

    def _parse_pack(self, data_source: str) -> Iterator[DataPack]:
        r"""
        Takes a data source uri and read data from it into :class:`~forte.data.data_pack.DataPack`.

        Args:
            data_source: uri of the image for OCR task.

        Returns: :class:`~forte.data.data_pack.DataPack` containing ImagePayload.
        """
        pack: DataPack = DataPack()
        payload_idx = 0

        # Read in Image data and store in DataPack
        # add Image payload into DataPack.payloads
        image_data = Image.open(requests.get(data_source, stream=True).raw)
        width, height = image_data.size
        ip.set_cache(image_data, [height, width])
        yield pack
OCR Character Processor
It analyzes the image in the DataPack ImagePayload and predicts the bounding box for each character. It wraps predicted bounding boxes and characters in Forte ontology and writes back into the DataPack.
[11]:
from forte.data.ontology.top import Box, Link
from ft.onto.base_ontology import Character, Document

from forte.processors.base.pack_processor import PackProcessor
import pytesseract

class OcrCharacterProcessor(PackProcessor):
    """
    A character processor that recognizes characters in an image using pytesseract.
    """
    def initialize(self, resources, configs):
        super().initialize(resources, configs)

    def _process(self, input_pack: DataPack):
        image_data = input_pack.image_payloads[0].cache
        ocr_text = pytesseract.image_to_string(image_data)
        input_pack.set_text(ocr_text)
        # recognize bounding boxes of text using tesseract
        boxes = pytesseract.image_to_boxes(image_data)
        # boxes are in the format of strings
        # each line of strings represents a configuration of one bounding box
        # each line is in the format of "character, x0, y0, x1, y1" and the origin is at the bottom-left corner
        boxes = boxes.strip().split("\n")
        begin = 0
        image_height = image_data.height
        # iterate over each line of boxes and add the corresponding
        # Character annotation into the data pack
        for b in boxes:
            b = b.split(" ")
            ch = b[0]
            # pytesseract returns the bounding box whose origin is at the bottom-left
            # so we need to convert the origin to the top-left by using the height of the image and swap y1 and y0
            x0, y1, x1, y0 = int(b[1]), image_height- int(b[2]), int(b[3]), image_height- int(b[4])
            # skip empty text
            while ocr_text[begin].isspace():
                begin += 1
            # for each recognized text, create a box, a character, and a link associating the box and the character
            if ocr_text[begin] == ch:
                character = Character(input_pack, begin, begin+1)
                box = Box(input_pack, [y0, x0], [y1, x1])
                Link(input_pack, character, box)
            else:
                raise ValueError(f"text {ocr_text[begin]} != {ch}")
            begin += 1
OCR Token Processor
It converts text in DataPack into tokens and computes the bounding box for each token based on the bounding box for characters from OcrCharacterProcessor. It wraps predicted bounding boxes, tokens, and their relationships in Forte ontology and writes back into the DataPack.
[12]:
from ft.onto.base_ontology import Token
class OcrTokenProcessor(PackProcessor):
    """
    A token processor that recognizes tokens in an image using pytesseract.
    """
    def initialize(self, resources, configs):
        super().initialize(resources, configs)

    def _process(self, input_pack: DataPack):

        image_data = input_pack.image_payloads[0].cache
        for token in input_pack.get(Token):
            if len(token.text) >= 1:
                charcters = list(token.get(Character))
                # obtain the bounding box of the first and last character of a token
                # so that we can locate the bounding box for the token
                first_ch_link = input_pack.get_links_by_parent(charcters[0])[0]
                last_ch_link =  input_pack.get_links_by_parent(charcters[-1])[0]
                first_ch_bb = first_ch_link.get_child()
                last_ch_bb = last_ch_link.get_child()
                top_left = [first_ch_bb.box_min_y, first_ch_bb.box_min_x]
                bottom_right = [last_ch_bb.box_max_y, last_ch_bb.box_max_x]
                # similar to adding characters in OCRProcessor
                # we add token bounding box, token and their link to the data pack
                token_box = Box(input_pack, top_left, bottom_right)
                Link(input_pack, token, token_box)
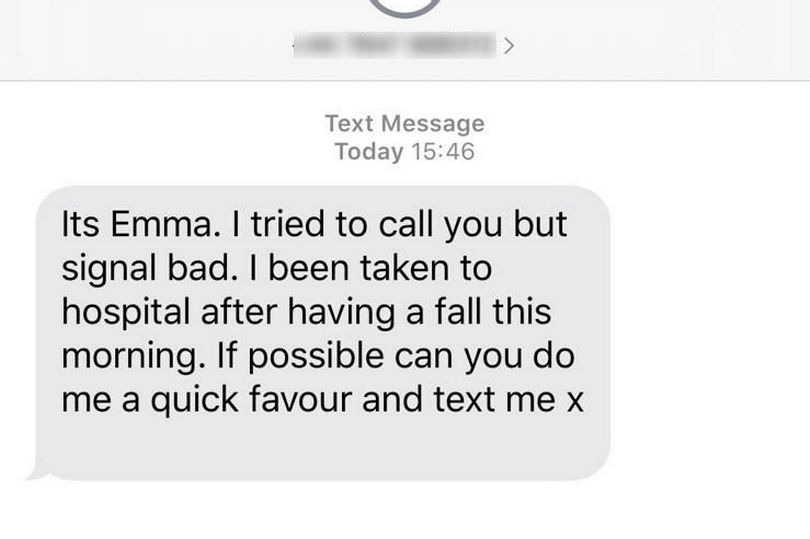
Let’s first take a look at the image we are going to analyze, and it’s a common cellphone messaging interface and contains text such as date and text body.
[13]:
import IPython
image_url = 'https://raw.githubusercontent.com/asyml/forte/assets/ocr_tutorial/ocr.jpg'
IPython.display.Image(image_url, width = 250)
[13]:
Let’s set up a Forte pipeline for the OCR task. As the processing order is the same as adding order. We have the following pipeline
OcrCharacterProcessorrecognizes bounding boxes for characters and the complete text in the image.NLTKWordTokenizertokenizes the complete text into tokens.OcrTokenProcessorrecognizes bounding boxes for tokens.
Therefore, we have the following code to set up the pipeline and process one image from an URL data source.
[14]:
from forte.pipeline import Pipeline
from fortex.nltk import NLTKWordTokenizer

pipeline = Pipeline[DataPack]()
pipeline.set_reader(
    OcrReader()
)
pipeline.add(OcrCharacterProcessor())
pipeline.add(NLTKWordTokenizer())
pipeline.add(OcrTokenProcessor())
pipeline.initialize()
pack = pipeline.process_one([image_url])
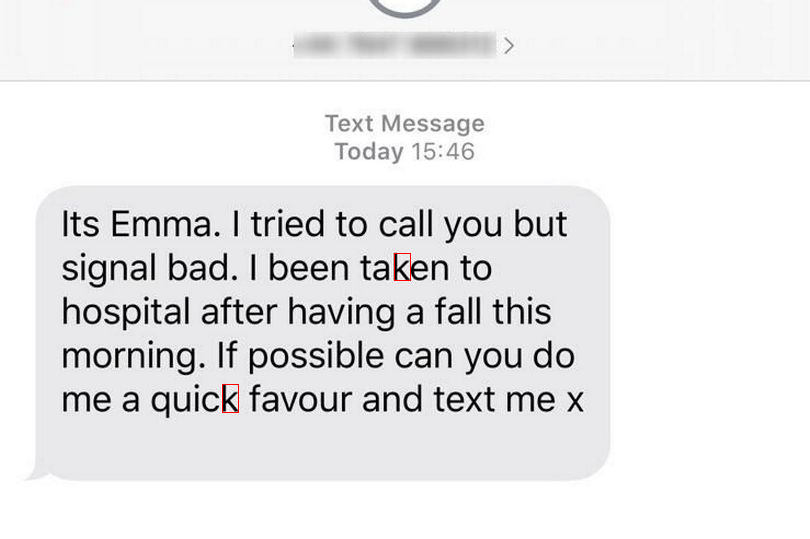
The code cell prompt User to recognize any character the user wants! Users can repetitively run this code cell, and it will keep prompting and recognizing.
[15]:
from PIL import Image, ImageDraw
charcters = list(pack.get(Character))
character_text = [ch.text for ch in charcters]
input_ch = ""

# check whether the input character is valid
while len(input_ch) != 1:
    input_ch = input("Enter the character you want to visualize: ")
    if len(input_ch) != 1:
        print("Please input a single character.")
    elif input_ch not in [c.text for c in charcters]:
        print(f"Character not found. Please input a single character from the text below: \n {pack.text}")
        input_ch = ""

# a function that iterates over all the characters in the text and returns the index of the character
def find(ch_list, char):
    for i, c in enumerate(ch_list):
        if c == char:
            yield i

image_data = Image.open(requests.get(image_url, stream=True).raw)
d = ImageDraw.Draw(image_data)
for ch_index in find(character_text, input_ch):
    link = pack.get_links_by_parent(charcters[ch_index])[0]
    ch = link.get_parent()
    ch_bb= link.get_child()

    d.rectangle([(ch_bb.box_min_x, ch_bb.box_min_y), (ch_bb.box_max_x, ch_bb.box_max_y)], outline = "#ff0000")
print("Input character: ", ch.text)
print(f"Recognized Bounding Box surrounding {ch.text}")
image_data
Input character:  k
Recognized Bounding Box surrounding k
[15]:
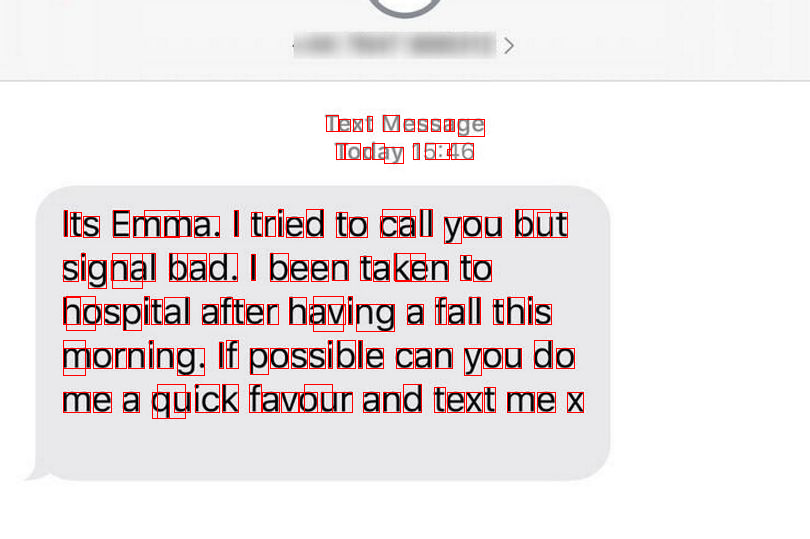
The user can run the code cell below to recognize the bounding boxes for all characters. It obtains the bounding box from the character and its link.
[16]:
from PIL import Image, ImageDraw
image_data = Image.open(requests.get(image_url, stream=True).raw)
d = ImageDraw.Draw(image_data)
for ch in pack.get(Character):
    ch_link = pack.get_links_by_parent(ch)[0]
    ch_bb = ch_link.get_child()
    d.rectangle([(ch_bb.box_min_x, ch_bb.box_min_y), (ch_bb.box_max_x, ch_bb.box_max_y)], outline = "#ff0000")
print("Recognized characters: \n", [ch.text for ch in pack.get(Character)])
Recognized characters:
 ['T', 'e', 'x', 't', 'M', 'e', 's', 's', 'a', 'g', 'e', 'T', 'o', 'd', 'a', 'y', '1', '5', ':', '4', '6', 'I', 't', 's', 'E', 'm', 'm', 'a', '.', '|', 't', 'r', 'i', 'e', 'd', 't', 'o', 'c', 'a', 'l', 'l', 'y', 'o', 'u', 'b', 'u', 't', 's', 'i', 'g', 'n', 'a', 'l', 'b', 'a', 'd', '.', '|', 'b', 'e', 'e', 'n', 't', 'a', 'k', 'e', 'n', 't', 'o', 'h', 'o', 's', 'p', 'i', 't', 'a', 'l', 'a', 'f', 't', 'e', 'r', 'h', 'a', 'v', 'i', 'n', 'g', 'a', 'f', 'a', 'l', 'l', 't', 'h', 'i', 's', 'm', 'o', 'r', 'n', 'i', 'n', 'g', '.', 'I', 'f', 'p', 'o', 's', 's', 'i', 'b', 'l', 'e', 'c', 'a', 'n', 'y', 'o', 'u', 'd', 'o', 'm', 'e', 'a', 'q', 'u', 'i', 'c', 'k', 'f', 'a', 'v', 'o', 'u', 'r', 'a', 'n', 'd', 't', 'e', 'x', 't', 'm', 'e', 'x']
Let’s take a look at bounding boxes for all characters.
[17]:
image_data
[17]:
As we mentioned in the introduction, our goal is to recognize text in the image, and here we plan to recognize tokens in the text. If we want to locate other relevant messages further, we must also ensure the token’s bounding box is tracked. Therefore, we use the ontology forte.data.ontology.top.Link that links forte.data.ontology.top.Annotation and forte.data.ontology.top.Box. For example, if we want to locate all Emma’s messages, we can search for the token “Emma” in the database
and then use the token’s bounding box to locate the message.
[18]:
image_data = Image.open(requests.get(image_url, stream=True).raw)
d = ImageDraw.Draw(image_data)
for token in pack.get(Token):
    token_link = pack.get_links_by_parent(token)[0]
    token_bb = token_link.get_child()
    d.rectangle([(token_bb.box_min_x, token_bb.box_min_y), (token_bb.box_max_x, token_bb.box_max_y)], outline = "#ff0000") # visualize the bounding box
print("Recognized tokens: \n", [tk.text for tk in pack.get(Token)])
Recognized tokens:
 ['Text', 'Message', 'Today', '15:46', 'Its', 'Emma.', '|', 'tried', 'to', 'call', 'you', 'but', 'signal', 'bad.', '|', 'been', 'taken', 'to', 'hospital', 'after', 'having', 'a', 'fall', 'this', 'morning.', 'If', 'possible', 'can', 'you', 'do', 'me', 'a', 'quick', 'favour', 'and', 'text', 'me', 'x']
[19]:
image_data
[19]:
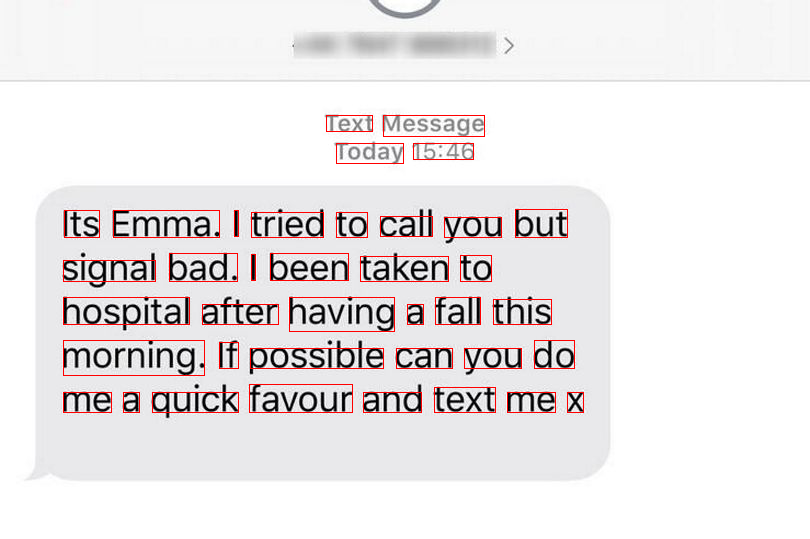
Wow! So far, we have successfully recognized and showed the bounding boxes for all tokens in the image. The next step is to use the tokens to search for the message in a database, and we leave this to the user with practical needs to implement.
Conclusion
In this tutorial, we showed how to
utilize Forte datapack and ontology to efficiently manage data of two different modalities, text and image. We can easily locate one by the other efficiently. We also make the data pack lightweight by storing essential data without loss of information for all modalities. We provide a unified data structure for data of different formats/modalities.
utilize Forte pipeline to incorporate third-party tools easily. We use
pytesseractto recognize characters in the image. We also useNLTKWordTokenizerto tokenize the text. Users can easily incorporate other third-party tools into our highly-customizable pipeline components
Discussion
In the pipeline above, considerate readers might notice we have a limitation that we cannot compute a bounding box for a word across different lines since we build the bounding box from characters’ bounding boxes. The top corner of the bounding box for the first character and the bottom right corner for the last character is used to compute the bounding box for the word. If they are in different lines, the user cannot use them to build a bounding box for the word. We will leave this as an exercise for the user to implement.
One can also add a
OcrSentenceProcessorandNLTKSentenceSegmenterto create bounding boxes for sentences just as the paired NLP components,NLTKWordTokenizerandOcrTokenProcessor.Wow! So far, we have successfully recognized and showed the bounding boxes for all tokens in the image. The next step is to use the tokens to search for the message in a database, and we leave this to the user with practical needs to implement.